Mastering Betaflight Firmware Updates for FPV Drones

When I first updated my FPV drone’s Betaflight firmware, I was just fumbling my way through the mysterious maze of flashing and configuring. What started as a nerve-wracking process soon became a story of trust in community advice, careful backups, and learning to respect the precision each step demands. If you’ve ever felt overwhelmed by firmware flashing, my tale and tips might just be the roadmap you need.
TL;DR: Updating Betaflight firmware is more than a software install—it’s about balancing risk and reward through backups, exact configurations, and community insights for your FPV drone’s flight controller.
Behind the Scenes: Why Betaflight Firmware Matters
When I first started tinkering with my FPV drone, I quickly learned that Betaflight firmware is much more than just a convenience. It’s the core operating system—the “brain”—of every modern flight controller. As Greg Bouten once said:
‘Betaflight is not just software; it’s the heartbeat of your drone’s flight controller.’
Each time I consider an update firmware process, I remind myself that new versions like Betaflight 4.3, 4.4, or the latest BF2025.12 (4.6) bring exciting bug fixes and features. For example, Betaflight 4.6 introduced major improvements in flight performance and hardware support. But every update comes with a hidden cost: flashing firmware often resets your flight controller to factory defaults. That means all your carefully tuned settings could vanish in a moment.
Through trial and error, I’ve learned to pause before hitting that “Flash Firmware” button. If my quad is flying smoothly and reliably, I ask myself—do I really need this update? Not every new feature is essential, and sometimes, stability is more valuable than the latest bells and whistles. The risk of losing custom configurations or facing unexpected bugs is real, especially for beginners.
- Betaflight 4.3: Brought improved filtering and PID tuning tools.
- Betaflight 4.4: Enhanced GPS rescue and added new receiver support.
- Betaflight 4.6 (BF2025.12): Major bug fixes, new hardware compatibility, and smoother flight.
Backing up my settings before any update is my golden rule. This simple step has saved me countless hours of frustration. I always use the Presets tab in Betaflight Configurator to save a CLI backup before making any changes.
Ultimately, understanding that Betaflight is the lifeblood of your FPV drone helps you respect the risks and rewards of every firmware update. A thoughtful pause before updating can mean the difference between a flawless flight and a day spent troubleshooting.
The Backup Ritual: Your Lifesaver in Firmware Updates
Before I ever hit “Flash Firmware” in Betaflight Configurator, I perform what I call the backup ritual. This isn’t just a habit—it’s a lifeline. The first time I updated my flight controller, I learned the hard way how quickly a misflash or wrong target can wipe out hours of tuning and setup. That’s why, whether you’re a beginner or a seasoned pilot, creating a configuration backup is the most important step you can take.
Using the Betaflight Configurator, I always head straight to the Presets tab and click the Save Backup button. This creates a CLI text file—a full snapshot of every setting on my flight controller, from PID tunes to custom modes. It’s the standard in the community, and for good reason. As Sagie Naicker wisely put it:
‘Never flash without a backup. It’s the single best insurance you can have.’
Backing up your CLI configuration file means that if anything goes wrong—like flashing the wrong firmware target or bricking the device—you can restore your drone’s exact setup in minutes. I once faced a near disaster after a misflash on my GEPRC Crocodile baby 4”. Motors spun erratically, and my OSD was gone. Thankfully, my backup tutorial had drilled the process into me. I simply opened the CLI tab, pasted my saved backup, and within moments, my quad was back to its old self.
- Step 1: Connect your flight controller via USB.
- Step 2: Go to the Presets tab in Betaflight Configurator.
- Step 3: Click Save Backup and store the CLI file safely.
Even experienced pilots make mistakes—backups are your parachute. The community’s advice is clear: always backup before you flash. It’s the simplest way to protect your hard-earned configuration and avoid starting from scratch.
Walking the Firmware Flasher Tightrope: Choosing Targets and Build Configurations
When I first faced the Betaflight firmware flasher, I quickly learned that picking the right board target is not just a detail—it’s the difference between a smooth update and a bricked flight controller. Each board, like the FlashHobby F722 or MATEKF411RX, has its own unique firmware target. If you flash the wrong one, you risk losing sensors, triggering LED error codes, or worse, ending up with a device that won’t connect at all. As Kevin Fuller once told me,
‘Selecting the right target is like choosing the right key to unlock your drone’s full potential.’
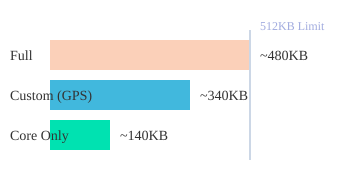
To avoid disaster, I always run the version command in the CLI before flashing. This reveals the exact target my flight controller needs. With the correct target selected, the next challenge is the Build Configuration. On chips with just 512KB—like the F411 or F722—memory is precious. Betaflight’s Cloud Build System lets me enable only the features I need: LED Strip for night flights, SoftSerial for extra UARTs, GPS for long-range, or VTX for analog video. Disabling unused options keeps my firmware lean and reliable.
One tempting option is “Core Only,” but I avoid it unless I have a specific reason. It strips away almost everything, which can leave you without essential features. I’ve seen pilots accidentally flash “Core Only” and wonder why their OSD or receiver stops working.
- Always match the firmware target to your flight controller model.
- Customize Build Configuration to your setup—don’t overload limited chips.
- Avoid “Core Only” unless you know exactly what you’re doing.
Choosing the right firmware flasher options and build configuration ensures your flight controller stays healthy, responsive, and ready for the skies.
Flashing Firmware: From COM Ports to DFU Mode Troubleshooting
Flashing Betaflight firmware always starts with one crucial step: finding the correct COM port. I learned early on to plug and unplug my flight controller while watching Betaflight Configurator’s port list. The right COM port appears and disappears with each connection—this simple trick prevents failed connections and hours of confusion.
Once connected, I head to the Firmware Flasher panel. Here, I select my board’s exact target, double-checking with the version command in the CLI if I’m unsure. Choosing the wrong target can lead to missing sensors or a bricked board. With the correct target, I use Load Firmware [Online] for official releases or Load Firmware [Local] for custom files. A final backup, then I hit Flash Firmware—the process itself takes under two minutes, but my nerves always make it feel longer.
Sometimes, things go sideways. The most common errors I see are “Waiting for Data” or “Failed to open connection”. That’s when DFU mode becomes essential. By holding the boot button on my flight controller while plugging in USB, I force the board into DFU (Device Firmware Update) mode. Betaflight Configurator should now show DFU instead of a COM port. If Windows still refuses to cooperate, I turn to the ImpulseRC Driver Fixer—this tool repairs or installs the correct drivers, a lifesaver for stubborn hardware.
‘When flashing stalls, DFU mode and driver tools become your best friends.’ – Manley Joe Desjarlais
Here’s a quick reference table from my experience:
| Step | Details |
|---|---|
| Flashing Duration | Under two minutes |
| Common Errors | ‘Waiting for Data’, ‘Failed to open connection’ |
| Driver Repair | ImpulseRC Driver Fixer for Windows |
Identifying the right COM port and using DFU mode are my go-to fixes for hardware connection errors during firmware flashing. These steps, paired with the right tools, make the process smooth—even when it feels daunting.
Post-Flash Protocols: Calibration, Motor Settings, and Community Insights
Once the Betaflight 4.6 firmware update finishes, my first move is always calibration. A freshly flashed flight controller resets many settings, so I place my drone on a level surface and hit “Calibrate Accelerometer” in the Setup tab. This simple step fixes control stability issues—without it, even a perfect configuration backup can’t save you from unpredictable flight behavior.
Next, I turn to motor output protocols. Betaflight lets you choose between DSHOT300 and DSHOT600 in the Motors tab. The right choice depends on your ESC firmware and PID loop rate. For most builds, DSHOT300 offers reliable communication, but if your ESCs and flight controller can handle it, DSHOT600 gives faster response. Matching these settings is crucial—get it wrong, and you risk desyncs or sluggish throttle response. I always double-check my ESC firmware compatibility before making changes.
Community wisdom has been my lifeline. When I ran into issues with GPS not working after a Betaflight update, it was a forum post that pointed out the new firmware version required a different UART setup. Another time, I learned—thanks to Glen George’s advice—that “Engage with the community; their experiences map the flight path ahead.” Stories like Muchamad Ramdany’s missing barometer (which turned out to be a hardware limitation, not a firmware bug) or Greg Bouten’s struggles with the GEPRC Crocodile baby 4” remind me that every board and firmware combo has its quirks.
One detail I picked up from the community: Blackbox logs on boards like the mamba F405 must be manually erased in the Blackbox tab. Flashing new firmware doesn’t clear dataflash memory, which can lead to confusion when troubleshooting.
Ultimately, post-flash protocols—calibration, motor protocol setup, and learning from others—are what make Betaflight configuration backup and updates truly effective. The FPV world is full of unique setups, and community insights often provide the missing piece to a stubborn problem.
The Human Side of Firmware: Stories, Ethics, and Ongoing Growth
When I first published my Betaflight firmware update guide back in September 2018, I never imagined how much it would grow—shaped by the community’s insights, evolving software, and a shared commitment to ethical transparency. Each major Betaflight release—4.3 in October 2022, 4.4 in January 2023, and the leap to BF2025.12—brought new challenges and learning opportunities. Every update to the guide was inspired by real pilots, like Glen George, who thanked me for clear steps, and Muchamad Ramdany, who puzzled over missing features until community feedback clarified the specs. Greg Bouten’s troubleshooting stories and D-Barr’s wisdom—
‘Firmware updates are a community effort, not just a solo task.’—reminded me that these guides are living documents, enriched by every shared success and setback.
Community insights have always been at the heart of my update guide. Pilots from all backgrounds—whether wrestling with a GEPRC Crocodile baby 4” or flashing a FlashHobby F722—have contributed their stories, helping others avoid pitfalls and find solutions. The guide’s evolution mirrors Betaflight’s own journey, adapting to new features and hardware, and proving that knowledge sharing is never static.
Ethical transparency is just as important as technical accuracy. I openly share my affiliate policies and cookie management practices, using only necessary, functional, and analytics cookies to respect privacy and build trust. This transparency supports free content creation, ensuring that anyone can access reliable Betaflight firmware advice without barriers.
Looking back, updating Betaflight firmware is more than a technical task—it’s a communal journey of learning, troubleshooting, and growth. Every update, every backup, and every lesson learned is part of a larger story, one that connects us as pilots and creators. As Betaflight and the FPV world continue to evolve, so too does our collective knowledge—fueled by open sharing, ethical standards, and the ongoing support of a passionate community.


